Monday, January 11, 2010

NEON Scarflets

Another Christmas Present!! These scarflets were made for my second youngest sister 'J'. She was the only one of the three that was excited about posing for pictures to go on my blog. So I apologize for the picture overload, but they are too good and funny to leave out!

I found neon scarfs made out of cotton. They were just basically a long piece of neon cotton sewn lengthwise in half. I got them for 50p each. BARGAIN!!! I started by taking out the seams that had them sewn in half. I did something a bit different for each scarf.

For the yellow one, I cut the newly reclaimed fabric lengthwise and tied the ends to make a big loop, about 8 feet circumfrence. I did this numerous times (I can't remember how many). When I had a bunch I doubled them onto themselves (so they were about 4 feet in circumfrence), so it appeared I had twice as many loops. Then took another long inch wide piece of fabric, and tied it around the end where the knots were to hold them together.

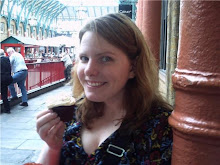
Here is Jessica modelling the yellow one in the lovely morning glow of Christmas morning. Here she is wearing it doubled.
For the pink one, I started by taking out the long seam that halved the material, same as the first one. For the strips I cut them width-wise; creating shorter inch-wide strips. These shorter strips were much stetchier. I knotted a bunch of them together to create one long strip. After I had an uber long strip, I wraped it around and around to make a 4 foot circumfrence. I took another strip and tied it around where the loose ends were to secure it.

Here she is modelling the pink one doubled. It has a different textrue than the yellow.
Here is the pink one left long.
And now we just got silly and kept taking picture....

Chuncky Beaded Chain-link


This is yet another Christmas present. This one was for my youngest sister. I was told by the second youngest sister (I have 3!) that she wanted something fashionable for Christmas. I don't consider myself very fashionable, ( I have a sense of style that is my own) but I tried. This is the beaded chain-link necklace that I made.

Recently I have been experimenting with beads, and I somehow managed to bead in a tube, so I connected little tubes of beads to create the chain. I then bought black ribbon to tie it around, and put big beads on either end of the connection points between the chains and the ribbon. (The beads were originally brown, but I painted them black with black nail polish so they had a shiny gloss to them). I kinda like the chunky chain look. I think it looks retro, yet fashionable!

Wednesday, January 6, 2010

Flight of Conchords T-shirt

This next gift was also made for the same sister 'L'. She is a fan of Flight of the Conchords. So I decided to embroider the back of a t-shirt for her. I got the idea from someone's post on Craftster where they embroidered the profiles of the two main characters, Bret and Jemaine on a tea towel.
I was very pleased because when she opened it, she was very pleased with it and asked where I got it from. Which I was then able to tell her I made it myself, which she could hardly believe.


Anyways here it is.... so you can see the orientation of the picture on the t-shirt


And a close up of embroidery itself....

Monday, January 4, 2010

Very Very hungry Xmas Present

Ok, this is first of the posting of the Christmas presents. I recently was unemployed, so knowing that I did not have extra cash to spend, I started making my three sisters their Christmas presents back in September. Some of them didn't get done until minutes before wrapping, but that's besides the point.
I have three sisters, so I decided to make each of the something that they could wear. This post will be about what I made my older sister 'L'. I found her incredibly easy to craft for, because I know she appreciates the handmade quality and uniqueness of crafted goods.

So lo and behold.
The Very Very Hungry Caterpillar Necklace.
Made from Polymers Clay and with Love

She is a Kindergarten teacher, and loves children's books. so I thought this appropriate, and it was!

Friday, December 4, 2009

Sugar Cookies!!!

Today I baked sugar cookies for a Christmas Party that my housemates and I are holding. I baked and decorated them. And by bake, i mean, i rolled out the dough, cut them with cookie cutters and put them in the oven. I did not make the dough, it was ready-made. NOT the store-bought ready-made, but wrote out the recipe, left it in the kitchen for my boyfriend to make- ready made. The best kind! Homemade taste, without the hassle - well for me, at least! I've been working alot, so I didn't have time. I got to the do the fun parts - baking and decorating.
Even though I didn't make the dough, I did write it out, and it is my sugar cookie stand by, so I will post the recipe.

Sugar Cookies

3 cups flour
1/12 tsp baking powder
1 cup unsalted butter, room-temp
1 cup white sugar
1 egg
1 tsp vanilla extract
1/4 tsp almond extract
1 tsp salt

Mix dry ingredients in med bowl.
In another bowl, cream butter and sugar until fluffy.
Add the egg, and extracts. Add the dry ingredients, slowly incorporating.

Roll into two disks, and cover with plastic wrap. Chill for at least 2 hours.

After chilled, roll out to 1/4 inch, and cut shapes, place on non-stick baking tray, or one covered with baking paper, and bake for 10 min at 170C or until edges start to brown.

Let cool completely before you start to decorate.


I thought it would fun to make the cookies on sticks, like lollypops! I also thought it would be nice to make them with the first initial of all the guests that are coming. So here they are:


I made a few decorated ones in case some Randos show-up. (Randos - (ran + doh's) random people) You never know. I also really wanted to bake gingerbread men, but I won't have time. I'm thinking Sunday when I get a day off.

To make the lolly pops, I bought candy sticks from a bulk food store. I pressed them part way onto the cookie, and then i took a bit of extra dough, and 'patched' a bit on top to cover the stick. I then baked the cookies with the patch part down. When I decorated the cookies, I decorated them with the patch side up, because it was the smoothest side. Also the icing covered the patch, so it looks seamless.


For the icing I used 3 tbs. of meringue powder, 500g of icing sugar and slowly incorporated warm water until I got the the consistency I wanted. For tips of decorating with icing sugar check out Sweetopia.

Wednesday, November 18, 2009

Navettes Sucrees

Fun Fact #6: J2O makes me really really hyper, especially the Apple Melon flavour. (no it isn't alcoholic)

I know it has been a while, but I have legit excuse. I have been working on projects, its just that most of the recent projects have been Christmas presents, and I know some of the recipients follow my blog, so I couldn't spoil it for them!

My recent adventures in the kitchen included another batch of the Browned Butter Chocolate Chip and these babys:

Navettes Sucrees - Sugar Shuttles

I have to admit, they kinda look like battered chicken wings!!! hahaha, only realized now! But I assure you they taste nothing like them!

These cookies taste simply delectable! I found this recipe on Gourmet's website. They compiled the best cookie recipes from 1941-2008. The Navettes Sucrees are the favourite of 1951, my mom wasn't even born then!! ;)

They are reminiscent a sugar cookie. They are cakey inside and have a crisp delicate outer shell. They seem to have a 'rustic' look about them. The shape of them is to resemble a shuttle in a sewing machine. I have to admit, I didn't really know what a sewing shuttle looked like, but thanks to google images, I was soon educated. Anyways, its cigar shaped and that's all you really need to know.

Navettes Sucrees
adapted from the original Gourmet recipe
1 cup sugar
1/4 cup white sugar
1/4 tsp salt
1/4 cup unsalted butter, room temp.
1 tsp vanilla
1/4 tsp almond essence
2 egg yolks
2 egg whites
small bowl of granulated sugar
  • Sift the flour into a mixing bowl, mix in the sugar and salt. Add the butter, vanilla, almond and yolks, and knead. (I mixed it with my hands)
  • Wrap the dough in cling film and put into the fridge to chill for 2 hours.
  • Preheat over at 350F/175C. (Actually I preheated mine to 160C because I have a fan oven)
  • Prepare two bowls, one with about a cup of granulated sugar, and one with lightly whisked egg whites. Break off some dough (about the size a small ping pong ball) and form into into the sewing shuttle or cigar shape with your hands. You should get around 16-18.
  • Line your baking tray with baking paper, and spaced them out. Then dip each one in the lightly whisked egg whites, and then roll them around in the sugar, and place back on the baking tray.
  • Bake in the over for about 12 minutes, or until they just start to turn lightly brown.


They are really really good warm, so i recommend eating one asap! The outside will have a delicate crisp sweet shell and the inside will be soft, dense and cakey. A good juxtaposition of textures!

I hope you like them as much as I did, but then again I love anything covered in sugar!

Friday, October 30, 2009

Pretty Pendants

Fun Fact #5: I loved horseradish when I was about 6 years old.

A few nights ago, I tried my hand at making pendants. I wanted them to look pretty, not cute, like th cupcakes.

I've been experimenting with miniature flowers. I think they are a bit messy, but I hope with practice they will look better.

Is a Rose, Is a Rose, Is a Rose


This rose was actually VERY simple. I just rolled a strip of polymers clay.


Purple Spaz and PurpPetals


Next are two yellow and purple pendents. I don't know how I feel about the shade of yellow I used....


Starfish Corsage corsage


This one I made by layering the spiky petals! Again with the dodgy yellow.